|

Give life to trees
Today, perhaps more than ever before, we have discovered how
important trees are to life on our planet. Trees provide food, medicine,
organic material for the soil and oxygen for the atmosphere. They
prevent erosion, give shelter to man and animals, balance nature and
transform barren areas. When chopped down by an axe or saw, the timber
has many uses. The more you know about trees, the easier it will be for
you to draw them in detail.
In this lesson I shall show you how to depict trees with added
realism. In many landscape pictures, trees tend to be in the middle or
far distance. However, where a tree is the main foreground subject in an
illustration, you need to know how to obtain the detailed effects of the
bark, branches and leaves. In order to draw it accurately what problems
must you solve? First ask yourself what shape the tree is. Is it round,
tall or spread out? What do the leaves look like? Are they fine, broad,
pointed or odd shaped? What is the trunk like? Smooth, craggy, ridged,
ringed or what? As with all subjects, it is essential constantly to
re-examine the construction of the items that go into a picture. Figure
1 illustrates how to draw leaves, trunk, and branches. Notice how dark
shadows help to give the trees depth and form. The drawing at left, a
tall tree, has been shaded on one side and almost blocked out where the
deep shadows are.
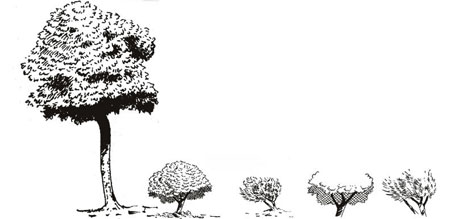 A
few small fine pen strokes are used to suggest the grain of the bark.
The two trees in the middle were shaded after they were drawn with
light, short strokes. A
few small fine pen strokes are used to suggest the grain of the bark.
The two trees in the middle were shaded after they were drawn with
light, short strokes.
These were cross-hatched to give deep shadows. The bottom sketches
show you how to make your leaves. Copy all these trees in pencil. Then
go over your work with a size 0.1 pen.
You don't have to use the identical shape or shading which I have
used. You may express your own ideas of how to obtain similar results.
If you follow the instructions carefully, you will easily become a good
tree artist. Hope that you do.
More about drawing trees in the next lesson. |


")
