|
Painting 101
Additional techniques in paintings
by Tissa Hewavitarane
There are many techniques especially in water colour painting. One
should learn and bring them out at the appropriate time. The real
purists will have them and call them 'gimmicks'. I suppose you would say
are rather like swear words - known about but kept in reserve until you
hit your thumb with a hammer. If you're continually using them they just
become boring. Take masking solutions. I suppose I use it in about one
in twenty of my paintings, when it really does fulfil a useful purpose.
Here then are few ideas, but watch it, they're no substitute for talent.
Washing out
The legend is that water colour once put on paper is there for good
and can't be altered, which is why so many would-be water colour
painters don't try it. The truth is of course very different. Whole
areas are sometimes the whole painting can be washed off and repainted
without anyone being any wiser. You will often get troubles with fore
grounds. The top half of the painting may be fine but something awful
comes over people when they put in fore grounds. They are unsure of
themselves, and it shows. It so often turns out be tired, over worked
muddy mess. First let the whole painting dry. This is very important.
Then put the paper in the sink and then turn the tap on gently until the
whole thing is immersed and the water is flowing over it. Surprisingly,
nothing happens to the colour until it is touched and then it flows
away. Use a soft hake brush gently to take away the ruined portions. It
often happens that distant hills or trees are painted in too dark,
bringing them too far forward. A gentle touch of the hake and they
gradually fade until they are about right. Of course, if the whole
painting has been over worked and is muddy you can remove it, just
leaving a faint image of the original.
|
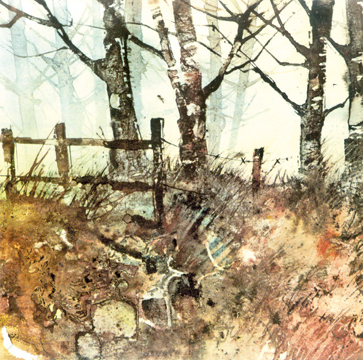
Roadside trees – using dry brush technique |
Lift the paper out of the water and put it on a drawing board to dry.
When it is dry you can paint over it, but if you want a wet-into-wet
treatment you can recommence the painting before it dries. Some colours
leave a strain on the paper that no amount of washing can remove. Don't
wait until you have crucial problems though, get out one of your
failures and experiment with it. Various water colour papers respond
differently to the treatment.
White paint
I never use the stuff myself because it's opaque. I always try to
keep water colours transparent. In water colour you may have to decide
where your whites are to be before you start your picture.
Either paint round them or mask them out. I always keep the white
paper open without introducing colour. You usually start by painting the
light tones first and work through the middle tones to the dark. With
the skies the chief fault is nearly always timidity. Don't play about
with skies, pushing the paint around too much, sometimes painting a blue
sky all over and then jabbing out their clouds with different colours
will always spoil your picture. My own feeling is the less you touch and
torture the surface the fresher and more professional the painting
looks.
Sponges
I always keep a small natural sponge while painting for all sorts of
purposes. If can be used to lift almost any colour clean while the paint
is still moist, such as wiping out light clouds in a darker sky. Its
main use is to produce texture by dabbling it, loaded with paint gently
on to paper. Keep on experimenting you'll find endless possibilities.
Try it with various consistencies of paint and even with synthetic
sponges, which come in course and fine textures.
Learn all you can about sponges and then put them away until a
legitimate use presents itself like texturing a large rock where it can
be use for putting in foliage.
Masking fluid
One of the problems that water colour has compared with oil painting
is the white areas. With oil painting you just use white paint but with
water colour you normally leave the paper blank and paint round the
space. This is fairly straight forward with large simple areas, but with
complex shapes, like white boats and houses against dark backgrounds,
it's sometimes almost impossible or at best inhibiting. The answer, of
course, is to cover the area with masking fluid. Masking fluid is a pale
yellow liquid you buy in bottles. It is a colloidal suspension of rubber
solution in water. You have to before you commence the picture where
your white areas are to be and then paint them with the solution. The
yellow colour is to show where you've applied it. You can then paint
over it with confidence and once dry it can be removed by gently rubbing
with the top of your finger and the virgin white paper appears where
it's needed.
Stencils
Using a stencil is a very useful technique for lifting out such
things as sails, seagulls and light figures. Say you want to put a white
seagull in front of a rock or sky.
After painting the background normally, draw your seagull on a
separate tracing paper overlay, cut out the shape with a stanly knife
and lay the stencil carefully in position scrubbing through the whole
with a bristle brush or sponge, and lifting off the moist colour with a
tissue. Do it gently and patiently, so as not to damage the paper and
don't use too much water or it will creep under the edge of the stencil.
www.tissahewavitarane.com
|