
Painting leaves
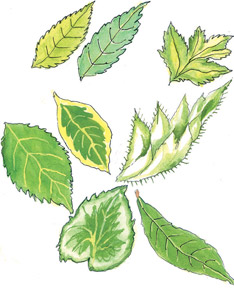
At first sight the leaves do not appear to have sufficient variation
in colour to be visually exciting to the artist, but on closer study you
will discover its many variations of green and some interesting
textures.The structure of a leaf is beautiful, with its sturdy thick
surface but some with smooth surface and long body tapering into various
proportions.
 Once the leaf if taken out it will last quite a long time before
showing signs of wilting. There is no frantic rush to paint it before
its colour fades away. Once the leaf if taken out it will last quite a long time before
showing signs of wilting. There is no frantic rush to paint it before
its colour fades away.
There are no hard rules to follow in drawing and painting leaves.
First do a careful study and put down an accurate basic shape of each
leaf and work into a finished drawing.
To start with, draw the subject with a sharp HB pencil, then first,
apply the transparent wash of colour. On the leaves with No. 2 brush or
No. 5 using a weak mixture of light green in which the tube its marked
sap green and lemon yellow.
Later, finish the final leaf with a No. 1 brush once the wash has
dried. Then add the details.
Starting with a pointed No. 1 brush, carefully mark the position of
the main veins. Before starting to paint, first position the leaves
balanced upright with a vase behind for support. Then draw the leaf or
leaves with a pencil before laying the first pale wash.
As the stage 2 after the initial wash of colour has dried, start
applying the shading on the leaves.Sit and watch carefully at the leaves
where the darker colours appear and where to shade the darker tones.
Use a mixture of dark green, prusian blue, and lemon yellow to shade
the base of the leaves and where the leaves show a dark colour when
leaves bend over.
As stage 3, concentrate on the body of the leaf, darken the colour
slightly using sap green and lemon yellow mixed with a little
ultramarine blue.
On top of this paint the delicate lines have to be drawn on the stems
of the leaves with a vertical brush strokes from bottom to top. A larger
No. 2 brush is used here for the broader washes. |


")


