Different techniques used in watercolour
by Tissa Hewavitharane
The watercolour is very sensitive to any attraction that is produced
on its surface. This quality is an advantage when the techniques that
provoke such changes are known.
|
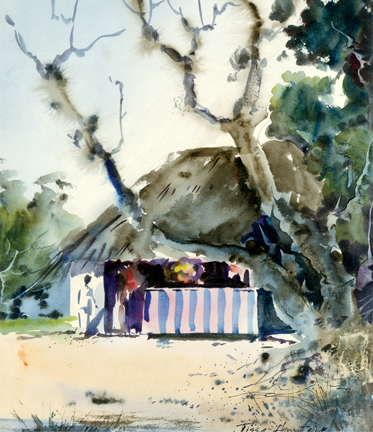
A wayside boutique |
Over the years a false mystique has been built up around the subject
of watercolour painting and the practice seemed to be weighed down by
rigid rules, dogma and ritual.
When using watercolours, accidents, often happen, like a scratch of
paper scraping with the brush or many other incidents.
There are many techniques that are normally used to alter the surface
of watercolour.
One of the most usual tools in the studio of a watercolour painter is
the hair dryer. This can speed up the water evaporation from the paper.
Another tool that can modify the surface of the paper is sandpaper. For
instance, the dark colour is painted in the usual way. In this exercise
I am going to explain some textures with sandpaper on painting of rocks.
Rocks
The colours used for the rocks can be very dark. Some techniques are
done when the colour is completely dry. To accelerate the drying of the
colour and work on the dark mass the paper has to be dried with a dryer.
If the paper is too wet it is wiser not to get very close with the
dryer so that the colour that runs on the drying is irregular on the
surface.
Rub the surface of the rock with a medium grain sandpaper. This
causes the upper layer of the paper to be taken off the dry colour with
it. It is not necessary to press too hard. Some areas can be kept
untouched. Just rub where you want to texture the surface.
Next you can repaint on the re-texture surface with very transparent
washes or with dark colours without completely covering up the surfaced
area. The effects that can be achieved without watercolour can be
realised on a completely dry surface, or on fresh paint.
When the paint is wet it is possible to achieve more varied results,
for it is not just a question of getting rid of the paint. Depending on
the type of paper, the painting can be scored with groves that do not
completely take off the superficial layer.
Brush
Here an experiment will be done with fresh paint. Scratch the paper
with the tip of the brush. At the opposite end to the hairs, that is to
say the tip the handle, there is another very practical tool which
offers many possibilities.
Different tasks can be done with the sharp end of the brush,
especially when the watercolour is moist. Some brushes have a sharp tip
and others have a bevelled tip, especially designed to scrape the paint.
When the painted surface is still moist, start with the tip of the
brush. Do not press too hard; the smallest indentation is enough to mark
the paper.
The indentation made on the paper, more colour is accumulated than
the rest of the surface, unless you insist several times with the brush.
In this case, pass the brush over each stroke.
By so doing, instead of building up more colour, part of it is taken
away and this makes the result a cleaner and finer tone.
Washing out
When the tip of the brush is pressed hard over the still moist
background it is possible to open whites like those among the trees that
are shown here. To make these types of marks not all brushes will do.
Some have a tip that is too blunt. It is necessary to make the
indentation that removes some of the paper. A sharp toothpick cloud be
used.
The legend is that watercolour, once put on the paper, is there for
good and cannot be altered, which is why so many would be watercolour
painters do not try it.
The truth is of course very different. Whole areas or sometimes the
whole painting can be washed off and repainted without any one being any
wiser. If you consider watercolour is like walking on a tight-rope, this
is a safety net. You will often get troubles with foregrounds.
Painting of knife
There are all sorts of ways of applying watercolour with a knife and
again experimenting will show you how.
Observe the painting I have done titled, "A wayside boutique." Study
the huge tree on the right. I have used the knife to scrape on a wet
layer of paint. By scraping already applied paint in a sort of spreading
butter motion you can produce interesting textures. Study the huge tree
which is more dominant.
The trunks are produced by a series of strokes with a scraping knife.
Timing is important, of the paint is too wet, the stroke will fill in
and it will finish up darker than light.
Observe the fine lines used for twigs, branches or short side way
strokes. I have experienced various watercolour papers repond
differently to the treatment. Kent drawing paper reacts but I have
experienced what or man and Bockingford drawing paper in a different
way. Do try it, Turner did.
Using sponges
Many watercolour artists keep a small natural sponge while painting
for all sorts of purposes. It can be used to lift almost any colour
clean while the paper is still moist, such as wiping out light clouds in
a darker sky. Its main use is to produce texture by dabbing it, loaded
with paint, gently on to paper. Keep on experimenting and you'll find
endless possibilities.
My own feeling is that it's always better to paint around our clouds,
sponged out clouds always look exactly that. As to its more productive
uses, it can be used to apply a wash, making sure that neither the
sponge nor the paint is too wet. Try it with various consistences of
paint and even with synthetic sponges, which come in coarse and fine
textures.
Using stencils
Using a stencil is a very useful technique for lifting out such
things as sails, seagulls and light figures. Say you want to put a white
seagull in front of a rock or sky. After painting the background
normally, draw your seagull on separate tracing paper overlay, cut out
the shape with a sharp knife and lay the stencil carefully in position,
scubbing through the hole with a damp bristle brush or sponge and
lifting off the moist colour with a tissue. Do it gently and patiently
so as not to damage the paper and don't use too much water or it will
creep under the edge of the stencil. |


")


