|
Painting 101:
Bringing a tree to life
by Tissa Hewavitharana
There may be millions of leaves on some trees, so you simply can't
paint them all. Simplification and generalisation again becomes
important, but looking and seeing are equally so. Each type of tree is
unique, no two are exactly alike, so always study the trees you are
going to paint.
Problems
When it comes to painting trees and foliage, there are two faults
that occur time after time. One is lack of observation and the other is
muddled brush work. The result is often a stereotyped cardboard cut out
of a tree with little thought of light and shade, and branches that are
silhouetted in front of the foliage rather than feeding up into it. What
I want to do is give you a few of the basic facts about drawing and
painting trees, some seemingly self evident but so often ignored when
painting.
Tree anatomy
There are of course many different species of trees, and no two trees
are the same. But there are certain anatomical points to watch out for
when painting trees, and by becoming familiar with them you will avoid
the stiff, awkward looking trees that spell 'amateur'.
|
Each species of trees has its own characteristic profile |
The structure of a tree capers gradually upwards from its trunk two
twigs. First of all, the trunk doesn't shoot straight out of the ground,
like a telegraph pole, normally some of the roots are visible. The main
limbs leave the trunk at an angle of roughly thirty degrees. No two
limbs the trunk directly opposite one another, or at the same angle so
watch out for this occurring in your painting.
The trunk becomes narrower as it divides off into limbs until
finally, at the top, there is no trunk at all only a split into the last
two limbs.
The limbs, in run, split into smaller, thinner branches. Again the
branches come off the limbs in a staggered form - never directly
opposite one another.
The angle of the branches is important. At the top of the tree they
leave the limbs at about a thirty degree angle, but as they descend the
tree they become more spaced out and the angle becomes wider until,
about two third down, the branches are horizontal.
At the same time, the length of the branches varies gradually
becoming longer as they descend the tree. Each species of trees has its
own characteristic silhouette or basic profile.
Branch structure is different too. Some trees branches out in a
characteristic 'Y' fashion, some in an erratic sickle shape. Another
often have a 'U' where the branch joins the trunk. Some branches leave
the trunk at night angles, and the lower, heavily weighted down ones
even bend under their own weight.
More important that one get into the habit of looking at trees
analytically with these points in mind before you get even your brush
and paints out. Last comes the twigs, which are thinnest and fan out
from the ends of the branches.
These fine twigs are important, because without them the tree appears
dead. However, trying to paint every individual twig is both impossible
an undesirable. Its better to paint the twigs by applying feathery dry
brush strokes in a paler tone.
Sky holes
One important factor that is often overlooked is the gaps between the
branches. Even when a tree is in full leaf there are lots of small gaps
through which the sky is visible, particularly around the outer edges.
Sky holes are sometimes called "space for the birds to fly through",
are often completely ignored. Often quite a lot of sky can be seen
through even thickest foliage sky-holes are too very important putting
these in also avoids that card board cut-out look.
Variety of shapes
Make a habit of studying the characteristic shapes of various species
of trees, taking particular note of their proportions and growth habits.
Notice, for example, how tall and how wide the canopy of a tree is in
comparison to its lower trunk.
A common fault lies in making the canopy too small and constructed,
which results in the dreaded 'lollipop' effect group of trees together
lose their own identity and unite to make one shape.
The common fault here is to overdo the detail on individual trees and
foliage groups. I try to resolve trees into two basic tones, putting the
lightest tone first and adding the strong darker tone while the first is
still damp, keeping in mind where the light source is.
Whenever I am painting trees I use a sable hair brush number eight or
twelve to paint foliage which forces me to eliminate fussy detail and
concentrate on the basic masses.
The direction of the strokes depends on the basic character of the
tree itself. Notice the trunk its direction, thickness, texture and how
lower branches radiate from it. How does it emerge from the ground?
Modelling
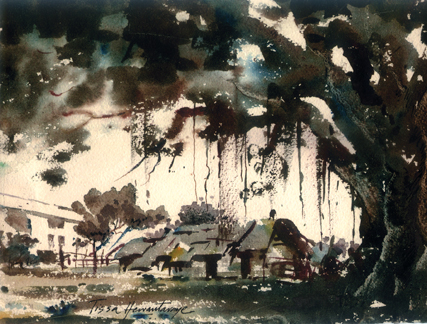
When a tree is shown close up, as you see in this painting titled
'the banian tree'. I have used mostly burnt umber, mixture of Prussian
blue modelled with light and shade to show the roundness of the trunk.
Notice how the trunk is graded from light and warm colours at the base
to dark and cool at the top.
Observe the strategic 'skyholes' which make the tree look more
delicate and graceful. Branches and foliage are massed into groups of
light and dark tones so that each one registers strongly against the
other.
A very thin brush called the rigger is used for painting delicate
lines and putting the branches and twigs.
The rigger - this brush has very long hair which enables you to,
produce, with practice, an enormous variety of widths of strokes
depending on the pressure on the brush.
A good watercolour painting of trees is one that looks fresh and
spontaneous. The way to achieve this quality is to translate all those
complex shapes and textures into a simpler language. In other words, use
descriptive brush work to suggest details, instead of laboriously
'reporting' them.
www. tissahewavitarane.com
|


")