|

Human faces II:
The
nose takes prominence
 The
basic shape and outline of human faces were shown in Lesson 3 entitled
'Giving shape to faces'. One of the many things about recording the
human face is the way we all differ from each other in every feature,
(identical twins excluded). The
basic shape and outline of human faces were shown in Lesson 3 entitled
'Giving shape to faces'. One of the many things about recording the
human face is the way we all differ from each other in every feature,
(identical twins excluded).
Most of us have uneven faces. One side is by no means symmetrical
with the other. So, drawing it requires careful study.
As explained before a pencil, can be used to give a good idea of the
slope and angle of the subject being drawn. (See prior lessons for
details)
Nose construction
Once you are able to accurately draw facial features, the whole face
can be undertaken with confidence. It is far simpler to break the job
down into stages than to try to master the whole thing at once.
 The
nose is the most obvious part of the face with which to start. Noses
come in all sorts of shapes and sizes, as do cheeks and other parts of
the face. The
nose is the most obvious part of the face with which to start. Noses
come in all sorts of shapes and sizes, as do cheeks and other parts of
the face.
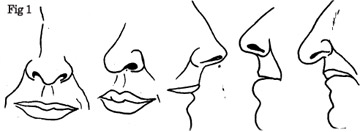
Noses can be crooked, straight, droopy, small, long, thin, fat, or
any other shape. A careful study is required before putting pencil to
paper. Figure (1) gives an example taken from life.
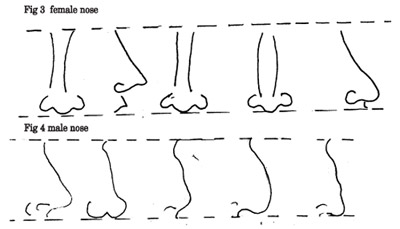
Notice how, whilst, the overall shape of each nose varies
considerably from person to person, the nostrils are essentially much
the same. They mainly differ only according to the angle from which they
are viewed. Observe Figure (2). Carefully study the noses on Figure (2)
then draw them as a practical guide.
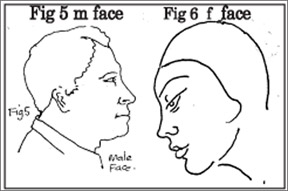
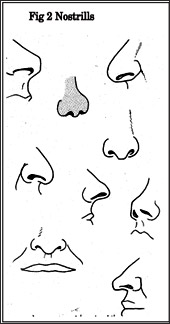
Draw them with fast, bold lines and don't worry about mistakes. Study
the additional examples in Figure (3) - line drawing of the female nose
and Figure (4) male nose. Figure (5) side of male face and Figure (6)
side position of female face. You may first draw by pencil and later by
pen and ink.
The more you practise, the more you improve in quality.
 |


")


