
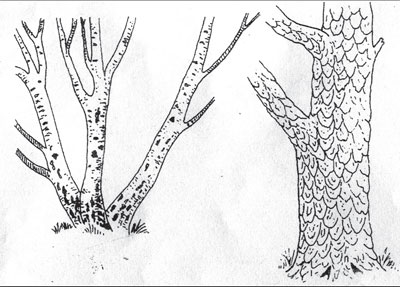
Drawing barks and trunks
For a good tree to be featured as the main subject of a picture you
must know how to produce realistic looking bark. Figure 1 shows four
types of bark and trunks. The first tree on the top left is a popular
subject for landscape work and simple to draw. See how the white trunk
is filled with black blotches that increase in number towards the base
of the tree. The bark surface pattern is shown by curved lines which run
around the trunk. The branches are dark in tone and this is shown by
shading. The second tree shown on the right is quite different. The bark
and the trunk is made up of large over-lapping scales which appear to
hang down the tree. Each of these slate-like pieces, when viewed close
up, can be seen to have small flakes in its make-up. It is clearly shown
with a few fine lines.
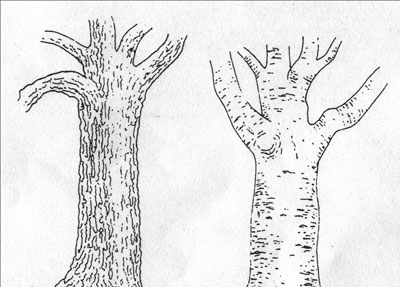
 The thrid tree often drawn or painted by artists is easy to sketch.
The bark is composed of rough, deep ridges, with many cracks. The trees
have heavy, sometimes twisted branches. A point to remember in drawing
trees is to draw one side in shadow with markings more detailed than the
opposite side. This helps to create depth and shape. If you use the same
way of showing bark for the whole trunk, it will look flat. Make one
side lighter, with less detail. The thrid tree often drawn or painted by artists is easy to sketch.
The bark is composed of rough, deep ridges, with many cracks. The trees
have heavy, sometimes twisted branches. A point to remember in drawing
trees is to draw one side in shadow with markings more detailed than the
opposite side. This helps to create depth and shape. If you use the same
way of showing bark for the whole trunk, it will look flat. Make one
side lighter, with less detail.
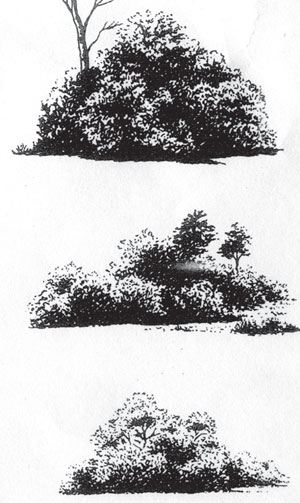
The bushes - It pays to spend a bit of time observing bushes and
shrubs to achieve the proper effects. Figure 2 illustrates how bushes
and small shrubs are drawn. They are an attractive part of a picture, if
properly drawn. Notice how the scribbled dark shadows tend to project
the lighter parts and this helps to suggest the form of a bush. Copy the
illustration shown on Figure 2. Drawing them will give you more
practice. |


")