
Painting a rabbit
The rabbit is another popular animal that could be drawn and painted.
It is a pet and most frequently drawn by a beginner.
 Rabbits are seen in gardens and homes. Children are fond of them and
they rear and feed them. It has a simple structure. If you look closely
you will find that its shape is oval. Rabbits are seen in gardens and homes. Children are fond of them and
they rear and feed them. It has a simple structure. If you look closely
you will find that its shape is oval.
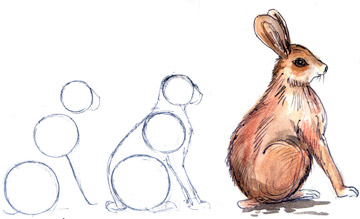
On figure 1, A1 and A2 show the basic outline drawing. You can use a
HB pencil with a sharp point.It will help you to get the formation
correct before painting. When the drawing is completed you can start to
add colour.
The sketch on the right, A3 shows a light grey applied over the body
of the rabbit using a mixture of burnt sienna. After this wash is half
dry, the rabbit's eye is added in black just before it is dry, water is
dropped into the middle and blotted with a squeezed-out brush.
 A mixture of a dark shaded colour is added when the first coating is
dry. Notice the long oval shaped ears which is bent on top. A mixture of a dark shaded colour is added when the first coating is
dry. Notice the long oval shaped ears which is bent on top.
The fur is painted with loose strokes and tiny lines to depict fur.
Observe how small and delicate the nose is and the curved mouth line.
Introduce the whiskers with a thin pointed nib or No. 1 pointed brush.
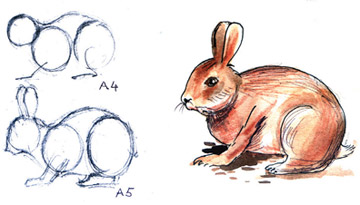
The rabbit painted in A3 is a common pose sitting up to eat.
On figure 2 the basic outline of the body structure is shown on A4
and A5, while a complete finished painting is shown in A6.A dark brown
wash is applied over the body using a mixture of burnt sienna. Next, the
ears, toes, claws and nose are defined with a fine brush and hairs added
over the central part of the body, head and feet.
The whiskers finish the painting.The paper to use is Whatman 180 gsm
or Kent paper 50 gsm, with a slight grain and brushes to be used are
sable hair No. 1, 2 and 6.You may do many drawings to be perfect in your
colour mixture. |


")


